Run Loops, Threading Programming Guide 번역
Intorduction | About Threaded Programming | Thread Management | Run Loops
Synchronization | Thread Safety Summary | Glossary
본 페이지는 Threading Programming Guide 문서의 Run Loops 부분을 번역해 놓은 페이지 입니다. 발 번역이라 이상한 부분이 있을 수 있습니다. 발견즉시 댓글을 달아 주세요.
Run Loops
루프를 실행
Run loops are part of the fundamental infrastructure associated with threads. A run loop is an event processing loop that you use to schedule work and coordinate the receipt of incoming events. The purpose of a run loop is to keep your thread busy when there is work to do and put your thread to sleep when there is none.
실행 루프는 스레드와 관련된 기본적인 인프라의 일부입니다.런 루프는 작업을 예약하고 들어오는 이벤트의 영수증을 조정하는 데 사용되는 이벤트 처리 루프입니다.운전 루프의 목적은 아무도가 없을 때 잠자기 실을 넣어하는 작업이 때 스레드가 바쁜 유지하는 것입니다.
Run loop management is not entirely automatic. You must still design your thread’s code to start the run loop at appropriate times and respond to incoming events. Both Cocoa and Core Foundation provide run loop objects to help you configure and manage your thread’s run loop. Your application does not need to create these objects explicitly; each thread, including the application’s main thread, has an associated run loop object. Only secondary threads need to run their run loop explicitly, however. The app frameworks automatically set up and run the run loop on the main thread as part of the application startup process.
루프 관리는 완전히 자동으로되지 않습니다 실행합니다. 당신은 여전히 적절한 시간에 실행 루프를 시작하고 들어오는 이벤트에 응답하기 위해 스레드의 코드를 설계해야합니다. 코코아 및 핵심 기초 모두 당신이 스레드의 실행 루프를 구성하고 관리 할 수 있도록하기 위해 실행 루프 개체를 제공합니다. 응용 프로그램은 명시 적으로 이러한 개체를 만들 필요가 없습니다, 응용 프로그램의 주 스레드를 포함하여 각 스레드는 관련 실행 루프 개체가 있습니다. 만 보조 스레드는하지만, 명시 적으로 실행 루프를 실행해야합니다.응용 프로그램은 자동으로 설정하고 응용 프로그램 시작 프로세스의 일부로서 주 스레드에서 실행 루프를 실행 프레임 워크입니다.
The following sections provide more information about run loops and how you configure them for your application. For additional information about run loop objects, see NSRunLoop Class Reference and CFRunLoop Reference.
다음 섹션에서는 실행 루프에 대한 자세한 정보를 제공하고 당신은 응용 프로그램을 구성하는 방법. 런 루프 개체에 대한 자세한 내용은 NSRunLoop 클래스 참조 및 CFRunLoop 참조를 참조하십시오.
Anatomy of a Run Loop
운전 루프의 구조
A run loop is very much like its name sounds. It is a loop your thread enters and uses to run event handlers in response to incoming events. Your code provides the control statements used to implement the actual loop portion of the run loop—in other words, your code provides the while or for loop that drives the run loop. Within your loop, you use a run loop object to "run” the event-processing code that receives events and calls the installed handlers.
운전 루프의 이름의 소리와 매우 비슷하다. 그것은 당신의 스레드가 입력 루프 들어오는 이벤트에 대한 응답으로 이벤트 핸들러를 실행합니다. 코드는 실행의 실제 루프 부분을 구현하는 데 사용되는 제어 문을 제공 루프의 다른 단어 코드가 실행 루프를 구동하는 동안 또는 루프를 제공합니다. 귀하의 루프 내에서 이벤트를 수신하고 설치 핸들러를 호출하는 이벤트 처리 코드를 "실행"을 실행 루프 개체를 사용합니다.
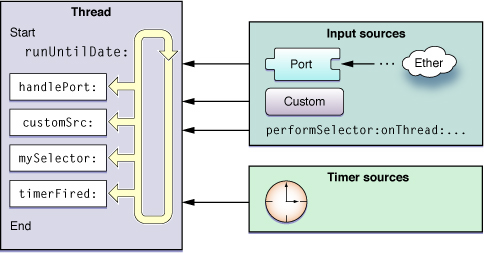
A run loop receives events from two different types of sources. Input sources deliver asynchronous events, usually messages from another thread or from a different application. Timer sources deliver synchronous events, occurring at a scheduled time or repeating interval. Both types of source use an application-specific handler routine to process the event when it arrives.
런 루프 소스의 두 가지 유형의 이벤트를 수신합니다. 입력 소스가 비동기 이벤트를 다른 스레드에서 또는 다른 응용 프로그램에서 일반적으로 메시지를 전달합니다. 타이머 소스 동기 이벤트, 예약 된 시간에 발생하거나 간격을 반복을 제공합니다. 소스의 두 가지 유형은 도착 이벤트를 처리하는 응용 프로그램 별 처리기 루틴을 사용합니다.
Figure 3-1 shows the conceptual structure of a run loop and a variety of sources. The input sources deliver asynchronous events to the corresponding handlers and cause the runUntilDate: method (called on the thread’s associated NSRunLoop object) to exit. Timer sources deliver events to their handler routines but do not cause the run loop to exit.
그림 3-1은 실행 루프와 다양한 소스의 개념 구조를 보여줍니다.입력 소스는 해당 처리기에 대한 비동기 이벤트를 제공하고 runUntilDate 원인 : 종료 방법 (스레드의 관련 NSRunLoop 개체에서 호출). 타이머 소스는 핸들러 루틴에 이벤트를 전달하지만, 종료 실행 루프가 발생하지 않습니다.
In addition to handling sources of input, run loops also generate notifications about the run loop’s behavior. Registered run-loop observers can receive these notifications and use them to do additional processing on the thread. You use Core Foundation to install run-loop observers on your threads.
입력 소스를 처리 할뿐만 아니라, 실행은 실행 된 루프의 동작에 대한 알림을 생성 루프. 등록 런 루프 관찰자는 이러한 알림을 수신 스레드에서 추가 처리를 수행하는 데 사용할 수 있습니다. 당신은 당신의 스레드에서 실행 루프 관찰자를 설치하는 코어 파운데이션을 사용합니다.
The following sections provide more information about the components of a run loop and the modes in which they operate. They also describe the notifications that are generated at different times during the handling of events.
다음 섹션에서는 실행 루프의 구성 요소들이 작동하는 모드에 대한 자세한 정보를 제공합니다. 또한 이벤트를 처리하는 동안 다른 시간에 생성되는 알림을 설명합니다.
Run Loop Modes
루프 모드를 실행
A run loop mode is a collection of input sources and timers to be monitored and a collection of run loop observers to be notified. Each time you run your run loop, you specify (either explicitly or implicitly) a particular “mode” in which to run. During that pass of the run loop, only sources associated with that mode are monitored and allowed to deliver their events. (Similarly, only observers associated with that mode are notified of the run loop’s progress.) Sources associated with other modes hold on to any new events until subsequent passes through the loop in the appropriate mode.
운전 루프 모드를 모니터 할 입력 소스 및 타이머의 수집 및 통보 할 런 루프 관찰자의 모음입니다. 당신이 실행 된 루프를 실행할 때마다, 당신은 (명시 적으로 또는 암시 적으로)를 실행하기 위해 특정 "모드"를 지정합니다.운전 루프의 단계에서, 그 모드 만 연결 소스 모니터링과 이벤트를 제공 할 수 있습니다. (마찬가지로,이 모드 만 연결 관찰자가 실행 된 루프의 진행 상황을 통보합니다.) 다른 모드와 관련된 소스는 해당 모드에서 루프를 연속 통과 할 때까지 모든 새 이벤트에 개최.
In your code, you identify modes by name. Both Cocoa and Core Foundation define a default mode and several commonly used modes, along with strings for specifying those modes in your code. You can define custom modes by simply specifying a custom string for the mode name. Although the names you assign to custom modes are arbitrary, the contents of those modes are not. You must be sure to add one or more input sources, timers, or run-loop observers to any modes you create for them to be useful.
코드에서, 당신은 이름 모드를 식별합니다. 코코아 및 핵심 기초 모두 코드에서 이러한 모드를 지정하는 문자열과 함께 기본 모드와 몇 가지 일반적으로 사용되는 모드를 정의합니다. 당신은 단순히 모드 이름에 대한 사용자 지정 문자열을 지정하여 사용자 지정 모드를 정의 할 수 있습니다. 사용자 정의 모드에 할당 이름은 임의이지만, 그 모드의 내용이 없습니다. 당신은 그들이 유용 할 당신이 만드는 모든 모드에 하나 이상의 입력 소스, 타이머, 또는 런타임 루프 관찰자를 추가해야합니다.
You use modes to filter out events from unwanted sources during a particular pass through your run loop. Most of the time, you will want to run your run loop in the system-defined “default” mode. A modal panel, however, might run in the “modal” mode. While in this mode, only sources relevant to the modal panel would deliver events to the thread. For secondary threads, you might use custom modes to prevent low-priority sources from delivering events during time-critical operations.
당신은 실행 루프를 통해 특정 단계에서 원하지 않는 소스에서 이벤트를 필터링 모드를 사용합니다. 시간의 대부분은, 당신이 시스템에 정의 된 "기본"모드에서 실행 된 루프를 실행하는 것이 좋습니다.모달 패널은, 그러나, "모달"모드에서 실행할 수 있습니다. 이 모드에서, 모달 패널에만 관련 소스는 스레드에 이벤트를 전달합니다. 보조 스레드를 들어, 시간이 중요한 작업 중에 이벤트를 전달에서 우선 순위가 낮은 소스를 방지하기 위해 사용자 정의 모드를 사용할 수 있습니다.
Table 3-1 lists the standard modes defined by Cocoa and Core Foundation along with a description of when you use that mode. The name column lists the actual constants you use to specify the mode in your code.
표 3-1에서는이 모드를 사용하는 경우에 대한 설명과 함께 코코아와 코어 재단에 의해 정의 된 표준 모드를 나열합니다.이름 열에는 코드에서 모드를 지정하는 데 사용하는 실제 상수를 나열합니다.
Mode | Name | Description |
|---|---|---|
Default |
| The default mode is the one used for most operations. Most of the time, you should use this mode to start your run loop and configure your input sources. 기본 모드는 대부분의 작업에 사용되는 하나입니다. 대부분의 시간, 당신은 당신의 런 루프를 시작하고 입력 소스를 구성하려면이 모드를 사용합니다. |
Connection |
| Cocoa uses this mode in conjunction with 코코아 응답을 모니터링 할 NSConnection 개체와 함께이 모드를 사용합니다. 당신은 거의이 모드를 직접 사용할 필요가 없어야합니다. |
Modal |
| Cocoa uses this mode to identify events intended for modal panels. 코코아 모달 패널을위한 이벤트를 식별하기 위해이 모드를 사용합니다. |
Event tracking |
| Cocoa uses this mode to restrict incoming events during mouse-dragging loops and other sorts of user interface tracking loops. 코코아 마우스 드래그 루프 및 사용자 인터페이스 추적 루프의 다른 종류의 동안 들어오는 이벤트를 제한하기 위해이 모드를 사용합니다. |
Common modes |
| This is a configurable group of commonly used modes. Associating an input source with this mode also associates it with each of the modes in the group. For Cocoa applications, this set includes the default, modal, and event tracking modes by default. Core Foundation includes just the default mode initially. You can add custom modes to the set using the 이것은 일반적으로 사용되는 모드의 설정 그룹입니다. 그 그룹에있는 각 모드와도 연관이 모드로 입력 소스를 연결. 코코아 응용 프로그램의 경우,이 설정은 기본적으로 모달, 기본적으로 이벤트 추적 모드를 포함하고 있습니다. 핵심 재단은 당초 기본 모드를 포함합니다. 당신은 CFRunLoopAddCommonMode 함수를 사용하여 집합에 사용자 정의 모드를 추가 할 수 있습니다. |
Input Sources
입력 소스
Input sources deliver events asynchronously to your threads. The source of the event depends on the type of the input source, which is generally one of two categories. Port-based input sources monitor your application’s Mach ports. Custom input sources monitor custom sources of events. As far as your run loop is concerned, it should not matter whether an input source is port-based or custom. The system typically implements input sources of both types that you can use as is. The only difference between the two sources is how they are signaled. Port-based sources are signaled automatically by the kernel, and custom sources must be signaled manually from another thread.
입력 소스는 스레드 비동기 이벤트를 제공합니다. 이벤트의 소스는 일반적으로 두 가지 범주 중 하나입니다 입력 소스의 종류에 따라 다릅니다. 포트 기반 입력 소스는 응용 프로그램의 마하 포트를 모니터링 할 수 있습니다. 사용자 정의 입력 소스는 이벤트의 사용자 정의 소스를 모니터링 할 수 있습니다. 지금까지의 실행 루프에 관한 한, 그것은 입력 소스가 포트 기반 또는 사용자 지정인지는 중요하지한다. 이 시스템은 일반적으로 사용할 수있는 두 가지 유형의 입력 소스를 구현합니다.두 소스 사이의 유일한 차이점은이 신호를하는 방법이다. 포트 기반 소스는 커널에 의해 자동으로 신호하는, 사용자 정의 소스는 다른 스레드에서 수동으로 신호를해야합니다.
When you create an input source, you assign it to one or more modes of your run loop. Modes affect which input sources are monitored at any given moment. Most of the time, you run the run loop in the default mode, but you can specify custom modes too. If an input source is not in the currently monitored mode, any events it generates are held until the run loop runs in the correct mode.
당신이 입력 소스를 만들 때, 당신은 당신의 운전 루프에 하나 이상의 모드에 할당합니다. 모드는 입력 소스가 어떤 주어진 순간에 모니터링되는 영향을 미칩니다. 대부분의 시간, 당신은 기본 모드에서 실행 루프를 실행,하지만 당신은 사용자 정의 모드를 지정할 수 있습니다.입력 소스가 현재 모니터 모드에 있지 않으면 실행 루프가 올바른 모드에서 실행까지가 생성하는 이벤트가 개최됩니다.
The following sections describe some of the input sources.
다음 섹션은 입력 소스의 일부를 설명합니다.
Port-Based Sources
포트 기반 소스
Cocoa and Core Foundation provide built-in support for creating port-based input sources using port-related objects and functions. For example, in Cocoa, you never have to create an input source directly at all. You simply create a port object and use the methods of NSPort to add that port to the run loop. The port object handles the creation and configuration of the needed input source for you.
코코아와 코어 재단은 포트 관련 개체와 함수를 사용하여 포트 기반 입력 소스를 만드는 기본적으로 지원합니다. 예를 들어, 코코아, 직접 모두에서 입력 소스를 만들 필요가 없습니다. 당신은 단순히 포트 개체를 만들고 실행 루프에 해당 포트를 추가 할 수 NSPort의 방법을 사용합니다.포트 개체는 당신을 위해 필요한 입력 소스의 생성 및 구성을 처리합니다.
In Core Foundation, you must manually create both the port and its run loop source. In both cases, you use the functions associated with the port opaque type (CFMachPortRef, CFMessagePortRef, or CFSocketRef) to create the appropriate objects.
코어 재단에서 수동으로 포트 및 실행 루프 소스를 모두 작성해야합니다. 두 경우 모두 해당 개체를 만들 수있는 포트 불투명 타입 (CFMachPortRef, CFMessagePortRef 또는 CFSocketRef)와 연관된 함수를 사용합니다.
For examples of how to set up and configure custom port-based sources, see “Configuring a Port-Based Input Source.”
사용자 정의 포트 기반 소스를 설정 및 구성하는 방법의 예를 들어, "포트 기반 입력 소스 구성"을 참조하십시오.
Custom Input Sources
사용자 정의 입력 소스
To create a custom input source, you must use the functions associated with the CFRunLoopSourceRef opaque type in Core Foundation. You configure a custom input source using several callback functions. Core Foundation calls these functions at different points to configure the source, handle any incoming events, and tear down the source when it is removed from the run loop.
사용자 정의 입력 소스를 만들려면, 당신은 핵심 재단 CFRunLoopSourceRef 불투명 유형과 관련된 기능을 사용해야합니다. 당신은 몇 가지 콜백 함수를 사용하여 사용자 정의 입력 소스를 구성합니다. 핵심 재단은 소스를 구성 들어오는 이벤트를 처리하고 그것을 실행 루프에서 제거 될 때 원인을 찢어 다른 지점에서이 함수를 호출합니다.
In addition to defining the behavior of the custom source when an event arrives, you must also define the event delivery mechanism. This part of the source runs on a separate thread and is responsible for providing the input source with its data and for signaling it when that data is ready for processing. The event delivery mechanism is up to you but need not be overly complex.
이벤트가 도착하면 사용자 지정 원본의 동작을 정의하는 것 외에도, 당신은 또한 이벤트 전달 메커니즘을 정의해야합니다. 소스의이 부분은 별도의 스레드에서 실행하고 데이터를 입력 소스를 제공하고 데이터를 처리하기위한 준비가되었을 때 그것을 신호에 대한 책임이 있습니다.이벤트 전달 메커니즘은 당신에게 달려 있지만 지나치게 복잡 할 필요가 없습니다.
For an example of how to create a custom input source, see “Defining a Custom Input Source.” For reference information for custom input sources, see alsoCFRunLoopSource Reference.
사용자 정의 입력 소스를 만드는 방법에 대한 예를 들어, "사용자 정의 입력 소스 정의"을 참조하십시오. 사용자 정의 입력 소스에 대한 참조 정보 alsoCFRunLoopSource 참조를 참조하십시오.
Cocoa Perform Selector Sources
코코아 선택기 소스를 수행
In addition to port-based sources, Cocoa defines a custom input source that allows you to perform a selector on any thread. Like a port-based source, perform selector requests are serialized on the target thread, alleviating many of the synchronization problems that might occur with multiple methods being run on one thread. Unlike a port-based source, a perform selector source removes itself from the run loop after it performs its selector.
포트 기반 소스뿐만 아니라, 코코아는 모든 스레드에서 선택을 수행 할 수 있도록 사용자 정의 입력 소스를 정의합니다.포트 기반 소스처럼 선택 요청을 여러 방법이 하나의 스레드에서 실행중인 발생할 수있는 동기화 문제의 많은 것을 완화 대상 스레드에 직렬화 수행합니다.포트 기반 소스는 달리, 그것이 그 선택을 수행 한 후 선택 소스가 실행 루프에서 자신을 제거 수행합니다.
When performing a selector on another thread, the target thread must have an active run loop. For threads you create, this means waiting until your code explicitly starts the run loop. Because the main thread starts its own run loop, however, you can begin issuing calls on that thread as soon as the application calls theapplicationDidFinishLaunching: method of the application delegate. The run loop processes all queued perform selector calls each time through the loop, rather than processing one during each loop iteration.
다른 스레드에서 선택을 수행 할 때 대상 스레드가 활성 실행 루프를 가지고 있어야합니다. 당신이 만들고 스레드를 들어,이 코드를 명시 적으로 실행 루프를 시작할 때까지 기다리는 것을 의미합니다. 응용 프로그램 대리자 방법 : 주 스레드가 자신의 실행 루프를 시작하기 때문에 응용 프로그램이 theapplicationDidFinishLaunching 호출로, 그러나, 당신은 곧 스레드에서 호출을 실행을 시작할 수 있습니다.런 루프는 큐에 대기중인 모든 선택기 오히려 각 루프 반복하는 동안 하나를 처리하는 것보다, 루프를 통해 매번 호출을 수행 처리합니다.
Table 3-2 lists the methods defined on NSObject that can be used to perform selectors on other threads. Because these methods are declared on NSObject, you can use them from any threads where you have access to Objective-C objects, including POSIX threads. These methods do not actually create a new thread to perform the selector.
표 3-2는 다른 스레드에서 선택기를 수행하는 데 사용할 수 있습니다 NSObject의에 정의 된 메서드를 보여줍니다. 이러한 방법은 NSObject의에서 선언되어 있기 때문에, 당신은 당신이 POSIX 스레드를 포함하여 오브젝티브-C 객체에 대한 액세스 권한이있는 모든 스레드에서 사용할 수 있습니다. 이러한 방법은 실제로 선택기를 수행하기 위해 새로운 스레드를 생성하지 않습니다.
Methods | Description |
|---|---|
Performs the specified selector on the application’s main thread during that thread’s next run loop cycle. These methods give you the option of blocking the current thread until the selector is performed. 해당 스레드의 다음 실행 루프 사이클 동안 응용 프로그램의 주 스레드에서 지정된 셀렉터를 수행합니다. 이 방법은 당신에게 선택이 수행 될 때까지 현재 스레드를 차단하는 옵션을 제공합니다. | |
Performs the specified selector on any thread for which you have an 당신이 NSThreadobject을 가지고있는 모든 스레드에서 지정된 셀렉터를 수행합니다. 이 방법은 당신에게 선택이 수행 될 때까지 현재 스레드를 차단하는 옵션을 제공합니다. | |
Performs the specified selector on the current thread during the next run loop cycle and after an optional delay period. Because it waits until the next run loop cycle to perform the selector, these methods provide an automatic mini delay from the currently executing code. Multiple queued selectors are performed one after another in the order they were queued. 다음 실행 루프 사이클 동안 및 선택적 지연 기간 후에 현재 스레드의 지정된 셀렉터를 수행합니다.다음 실행 루프 사이클이 선택을 수행 할 때까지 대기하기 때문에이 방법은 현재 실행중인 코드에서 자동 미니 지연을 제공합니다. 여러 대기 선택기들이 대기 된 순서대로 잇달아 수행됩니다. | |
Lets you cancel a message sent to the current thread using the withObject : afterDelay : orperformSelector : withObject : afterDelay : inModes 방법 : 당신이 theperformSelector을 사용하여 현재 스레드에 보낸 메시지를 취소 할 수 있습니다. |
For detailed information about each of these methods, see NSObject Class Reference.
이러한 각 방법에 대한 자세한 내용은 NSObject의 클래스 참조를 참조하십시오.
Timer Sources
타이머 소스
Timer sources deliver events synchronously to your threads at a preset time in the future. Timers are a way for a thread to notify itself to do something. For example, a search field could use a timer to initiate an automatic search once a certain amount of time has passed between successive key strokes from the user. The use of this delay time gives the user a chance to type as much of the desired search string as possible before beginning the search.
타이머 소스는 미래의 지정된 시간에 당신의 스레드에 이벤트를 동 기적으로 제공합니다. 타이머 뭔가를 자체를 통지하는 스레드에 대한 방법입니다. 예를 들어, 검색 필드는 특정 시간에 사용자로부터 연속적인 키 입력 사이에 전달되면 자동으로 검색을 시작하는 타이머를 사용할 수 있습니다. 이 지연 시간의 사용은 사용자에게 검색을 시작하기 전에 가능한 한 원하는 검색 문자열만큼 입력 할 수있는 기회를 제공합니다.
Although it generates time-based notifications, a timer is not a real-time mechanism. Like input sources, timers are associated with specific modes of your run loop. If a timer is not in the mode currently being monitored by the run loop, it does not fire until you run the run loop in one of the timer’s supported modes. Similarly, if a timer fires when the run loop is in the middle of executing a handler routine, the timer waits until the next time through the run loop to invoke its handler routine. If the run loop is not running at all, the timer never fires.
이 시간 기반 알림을 생성하지만, 타이머 실시간 메커니즘 없습니다. 입력 소스와 마찬가지로, 타이머는 실행 루프의 특정 형태와 연관되어 있습니다.타이머가 현재 실행 루프에 의해 감시되는 모드에 있지 않은 경우에는 타이머의 지원되는 모드 중 하나를 실행 루프를 실행 할 때까지 발생하지 않습니다.런 루프가 핸들러 루틴을 실행하는 중간에있을 때 타이머가 발생하는 경우 마찬가지로 타이머 핸들러 루틴을 호출하는 실행 루프를 할 때까지 기다립니다.런 루프가 전혀 실행되지 않는 경우, 타이머가 발생하지 않습니다.
You can configure timers to generate events only once or repeatedly. A repeating timer reschedules itself automatically based on the scheduled firing time, not the actual firing time. For example, if a timer is scheduled to fire at a particular time and every 5 seconds after that, the scheduled firing time will always fall on the original 5 second time intervals, even if the actual firing time gets delayed. If the firing time is delayed so much that it misses one or more of the scheduled firing times, the timer is fired only once for the missed time period. After firing for the missed period, the timer is rescheduled for the next scheduled firing time.
당신은 한 번 또는 반복적으로 이벤트를 생성하기 위해 타이머를 구성 할 수 있습니다. 자동 예약 된 소성 시간이 아니라 실제 발사 시간에 따라 반복 타이머를 재조정 자체.타이머가 그 후 특정 시간 5 초에 발사 할 예정이다 예를 들어, 예약 된 소성 시간은 항상 실제 소성 시간이 지연되는 경우에도 원래의 시간은 5 초 간격에 떨어질 것이다.발사 시간이 너무 많이 예약 된 발사 시간 중 하나 이상을 그리워하는 지연되면 타이머가 누락 된 기간 동안 한 번만 발생합니다. 부재 기간 동안 소성 후, 타이머는 다음 예약 발사 시간을 재조정합니다.
For more information on configuring timer sources, see “Configuring Timer Sources.” For reference information, see NSTimer Class Reference or CFRunLoopTimer Reference.
타이머 소스를 구성하는 방법에 대한 자세한 내용은 "타이머 소스 구성"을 참조하십시오. 참조 정보 NSTimer 클래스 참조 또는 CFRunLoopTimer 참조를 참조하십시오.
Run Loop Observers
루프 관찰자를 실행
In contrast to sources, which fire when an appropriate asynchronous or synchronous event occurs, run loop observers fire at special locations during the execution of the run loop itself. You might use run loop observers to prepare your thread to process a given event or to prepare the thread before it goes to sleep. You can associate run loop observers with the following events in your run loop:
적절한 비동기 또는 동기 이벤트가 발생하면 불 런 루프 자체의 실행 중에 특별한 위치에 루프 관찰자 화재를 실행하는 소스는 달리. 당신은 지정된 이벤트를 처리하는거나 절전 모드로 전환되기 전에 스레드를 준비하기 위해 스레드를 준비하기 위해 실행 루프 관찰자를 사용할 수 있습니다. 당신은 실행 루프에서 다음과 같은 이벤트를 실행 루프 관찰자를 연결할 수 있습니다 :
The entrance to the run loop.
운전 루프의 입구.When the run loop is about to process a timer.
런 루프는 타이머를 처리하기에 관하여됩니다.When the run loop is about to process an input source.
운전 루프에 입력 소스를 처리하기에 관하여됩니다.When the run loop is about to go to sleep.
런 루프가 잠을 잘려고 할 때.When the run loop has woken up, but before it has processed the event that woke it up.
런 루프는 깨어있다, 그러나 그것을 깨어 이벤트를 처리하기 전에합니다.The exit from the run loop.
실행 루프에서 종료합니다.
You can add run loop observers to apps using Core Foundation. To create a run loop observer, you create a new instance of the CFRunLoopObserverRef opaque type. This type keeps track of your custom callback function and the activities in which it is interested.
당신은 코어 파운데이션을 사용하여 응용 프로그램을 실행하는 루프 관찰자를 추가 할 수 있습니다.런 루프 관찰자를 만들려면, 당신은 CFRunLoopObserverRef 불투명 형식의 새 인스턴스를 만듭니다. 이 유형은 사용자 정의 콜백 함수와 관심이되는 활동을 추적합니다.
Similar to timers, run-loop observers can be used once or repeatedly. A one-shot observer removes itself from the run loop after it fires, while a repeating observer remains attached. You specify whether an observer runs once or repeatedly when you create it.
타이머와 유사하게, 실행 루프 관찰자가 한 번 또는 반복적으로 사용할 수 있습니다.반복 관찰자가 붙어 남아있는 동안 원샷 관찰자는 그것이 발생 후 실행 루프에서 자신을 제거합니다. 당신은 당신이 그것을 만들 때 관찰자가 한 번 또는 반복적으로 실행할지 여부를 지정합니다.
For an example of how to create a run-loop observer, see “Configuring the Run Loop.” For reference information, see CFRunLoopObserver Reference.
"실행 루프 구성"을 참조하십시오. 런 루프 관찰자를 만드는 방법에 대한 예제를 보려면 참조 정보 CFRunLoopObserver 참조를 참조하십시오.
The Run Loop Sequence of Events
이벤트의 실행 루프 시퀀스
Each time you run it, your thread’s run loop processes pending events and generates notifications for any attached observers. The order in which it does this is very specific and is as follows:
당신이 그것을 실행할 때마다, 귀하 스레드의 실행 루프 프로세스 이벤트를 보류하고 연결된 모든 관찰자에 대한 알림을 생성합니다. 그것은이 작업을 수행하는 순서는 매우 다르며 다음과 같습니다 :
Notify observers that the run loop has been entered.
런 루프가 입력되었는지 관찰자에게 알립니다.Notify observers that any ready timers are about to fire.
모든 준비가 타이머 화재에 대한 것을 관찰자에게 알립니다.Notify observers that any input sources that are not port based are about to fire.
포트 기반하지 않는 모든 입력 소스 화재에 대한 것을 관찰자에게 알립니다.Fire any non-port-based input sources that are ready to fire.
발사 준비가 아닌 포트 기반 입력 소스를 화재.If a port-based input source is ready and waiting to fire, process the event immediately. Go to step 9.
포트 기반 입력 소스가 준비 화재 기다리고있는 경우, 즉시 이벤트를 처리합니다. 9 단계로 이동합니다.Notify observers that the thread is about to sleep.
스레드 잠을 약하는 관찰자에게 알립니다.Put the thread to sleep until one of the following events occurs:
다음 이벤트 중 하나가 발생할 때까지 잠을 스레드를 넣어 :An event arrives for a port-based input source.
이벤트는 포트 기반의 입력 소스에 도착합니다.A timer fires.
타이머가 발생합니다.The timeout value set for the run loop expires.
운전 루프에 설정된 시간 초과 값이 만료됩니다.The run loop is explicitly woken up.
런 루프는 명시 적으로 깨어 있습니다.
Notify observers that the thread just woke up.
스레드가 방금 깨어있는 관찰자에게 알립니다.Process the pending event.
보류중인 이벤트를 처리합니다.If a user-defined timer fired, process the timer event and restart the loop. Go to step 2.
사용자 정의 타이머가 발생하면, 타이머 이벤트를 처리하고 루프를 다시 시작합니다. 2 단계로 이동합니다.If an input source fired, deliver the event.
입력 소스가 발생하는 경우, 이벤트를 제공합니다.If the run loop was explicitly woken up but has not yet timed out, restart the loop. Go to step 2.
런 루프가 명시 적으로 깨어되었지만 아직 시간이 초과되지 않은 경우, 루프를 다시 시작합니다. 2 단계로 이동합니다.
Notify observers that the run loop has exited.
실행 루프가 종료되었음을 관찰자에게 알립니다.
Because observer notifications for timer and input sources are delivered before those events actually occur, there may be a gap between the time of the notifications and the time of the actual events. If the timing between these events is critical, you can use the sleep and awake-from-sleep notifications to help you correlate the timing between the actual events.
이러한 이벤트가 실제로 발생하기 전에 타이머 및 입력 소스에 대한 관찰자 알림이 전달되기 때문에, 알림 시간과 실제 이벤트 시간 사이에 차이가있을 수 있습니다. 이러한 이벤트 사이의 타이밍이 중요하다면, 당신은 실제 이벤트 사이의 시간 상관 관계를하는 데 도움이되는 수면과 깨어있는 -에서 - 수면 알림을 사용할 수 있습니다.
Because timers and other periodic events are delivered when you run the run loop, circumventing that loop disrupts the delivery of those events. The typical example of this behavior occurs whenever you implement a mouse-tracking routine by entering a loop and repeatedly requesting events from the application. Because your code is grabbing events directly, rather than letting the application dispatch those events normally, active timers would be unable to fire until after your mouse-tracking routine exited and returned control to the application.
당신은 루프가 해당 이벤트의 전달을 방해하는 우회, 실행 루프를 실행할 때 타이머 및 기타 정기적 인 이벤트를 전달하기 때문이다. 응용 프로그램에서 루프를 반복적으로 요청하는 이벤트를 입력하여 마우스 추적 루틴을 구현할 때마다이 문제의 전형적인 예가 발생합니다. 코드가 아닌 응용 프로그램이 일반적으로 이러한 이벤트를 전달시키는 것보다, 직접 이벤트를 잡아 때문에, 활성 타이머는 마우스 추적 루틴이 종료되고 응용 프로그램에 제어를 리턴 할 때까지 발사 할 수 없게됩니다.
A run loop can be explicitly woken up using the run loop object. Other events may also cause the run loop to be woken up. For example, adding another non-port-based input source wakes up the run loop so that the input source can be processed immediately, rather than waiting until some other event occurs.
런 루프는 명시 적으로 실행 루프 개체를 사용 깨어 수 있습니다. 다른 이벤트는 실행 루프가 깨어 될 수 있습니다. 예를 들어, 다른 비 포트 기반 입력 소스를 추가하면 입력 소스가 아닌 다른 이벤트가 발생할 때까지 기다리지 않고, 즉시 처리 될 수 있도록 실행 루프를 일어난다.
When Would You Use a Run Loop?
때 실행 루프를 사용해야합니까?
The only time you need to run a run loop explicitly is when you create secondary threads for your application. The run loop for your application’s main thread is a crucial piece of infrastructure. As a result, the app frameworks provide the code for running the main application loop and start that loop automatically. The runmethod of UIApplication in iOS (or NSApplication in OS X) starts an application’s main loop as part of the normal startup sequence. If you use the Xcode template projects to create your application, you should never have to call these routines explicitly.
당신은 명시 적으로 실행 루프를 실행하는 데 필요한 유일한 시간은 당신의 응용 프로그램에 대한 보조 스레드를 만들 때이다. 응용 프로그램의 주 스레드를 실행 루프 인프라의 중요한 부분입니다.그 결과로, 응용 프로그램 프레임 워크는 기본 응용 프로그램 루프를 실행하기위한 코드를 제공하고 자동으로 해당 루프를 시작합니다. 이오스 UIApplication의 runmethod (또는 OS X에서 NSApplication)은 정상적인 시작 시퀀스의 일부로 응용 프로그램의 메인 루프를 시작합니다. 응용 프로그램을 만들 Xcode의 템플릿 프로젝트를 사용하는 경우, 당신은 명시 적으로 이러한 루틴을 호출 할 필요가 없습니다 안됩니다.
For secondary threads, you need to decide whether a run loop is necessary, and if it is, configure and start it yourself. You do not need to start a thread’s run loop in all cases. For example, if you use a thread to perform some long-running and predetermined task, you can probably avoid starting the run loop. Run loops are intended for situations where you want more interactivity with the thread. For example, you need to start a run loop if you plan to do any of the following:
보조 스레드를 들어, 실행 루프가 필요한지 여부를 결정해야하고, 경우, 구성하고 스스로를 시작합니다. 당신은 모든 경우에 스레드의 실행 루프를 시작할 필요가 없습니다. 당신이 어떤 장기 실행 및 소정의 작업을 수행 할 스레드를 사용하는 경우, 예를 들어, 당신은 아마 실행 루프를 시작 방지 할 수 있습니다. 당신은 스레드와 더 많은 상호 작용을하려는 실행 루프 상황을위한 것입니다. 예를 들어, 당신은 다음 중 하나를 수행하려는 경우 실행 루프를 시작해야합니다 :
Use ports or custom input sources to communicate with other threads.
다른 스레드와 통신 할 포트 또는 사용자 정의 입력 소스를 사용합니다.Use timers on the thread.
스레드에서 타이머를 사용합니다.Use any of the
performSelector… methods in a Cocoa application.
performSelector의 ... 코코아 응용 프로그램에서 메서드를 사용합니다.Keep the thread around to perform periodic tasks.
주기적인 작업을 수행하는 주위의 스레드를 유지합니다.
If you do choose to use a run loop, the configuration and setup is straightforward. As with all threaded programming though, you should have a plan for exiting your secondary threads in appropriate situations. It is always better to end a thread cleanly by letting it exit than to force it to terminate. Information on how to configure and exit a run loop is described in “Using Run Loop Objects.”
당신이 실행 루프를 사용하도록 선택하는 경우, 구성 및 설치가 간단합니다. 그러나 모든 스레드 프로그래밍과 마찬가지로, 당신은 적절한 상황에서 보조 스레드를 종료하기위한 계획이 있어야합니다. 그것은 강제로 종료하는 것보다 그것을 종료 시켜서 완전히 스레드를 종료하는 것이 좋습니다. 구성하고 실행 루프를 종료하는 방법에 대한 정보가 설명되어 "실행 루프 개체 사용"을 참조하십시오.
Using Run Loop Objects
실행 루프 개체 사용
A run loop object provides the main interface for adding input sources, timers, and run-loop observers to your run loop and then running it. Every thread has a single run loop object associated with it. In Cocoa, this object is an instance of the NSRunLoop class. In a low-level application, it is a pointer to a CFRunLoopRefopaque type.
실행 루프 개체는 실행 루프에 입력 소스, 타이머 및 실행 루프 관찰자를 추가하고이를 실행하기위한 기본 인터페이스를 제공합니다. 모든 스레드는 그와 연관된 단일 실행 루프 개체가 있습니다. 코코아,이 객체는 NSRunLoop 클래스의 인스턴스입니다. 낮은 수준의 응용 프로그램에서는 CFRunLoopRefopaque 형식에 대한 포인터입니다.
Getting a Run Loop Object
실행 루프 개체 가져 오기
To get the run loop for the current thread, you use one of the following:
현재 스레드의 실행 루프를 얻으려면, 당신은 다음 중 하나를 사용하십시오 :
In a Cocoa application, use the
currentRunLoopclass method ofNSRunLoopto retrieve anNSRunLoopobject.
코코아 응용 프로그램에서 NSRunLoop 개체를 검색 할 수 NSRunLoop의 currentRunLoop 클래스 메서드를 사용합니다.Use the
CFRunLoopGetCurrentfunction.
CFRunLoopGetCurrent 기능을 사용합니다.
Although they are not toll-free bridged types, you can get a CFRunLoopRef opaque type from an NSRunLoop object when needed. The NSRunLoop class defines agetCFRunLoop method that returns a CFRunLoopRef type that you can pass to Core Foundation routines. Because both objects refer to the same run loop, you can intermix calls to the NSRunLoop object and CFRunLoopRef opaque type as needed.
그들은 수신자 부담 브리지 타입은 아니지만 필요할 때, 당신은 NSRunLoop 개체에서 CFRunLoopRef 불투명 한 유형을 얻을 수 있습니다.NSRunLoop 클래스를 사용하면 코어 재단 루틴에 전달할 수있는 CFRunLoopRef 형식을 반환 agetCFRunLoop 방법을 정의합니다. 두 객체가 동일한 실행 루프를 참조하므로 인터 NSRunLoop 개체와 필요에 따라 CFRunLoopRef 불투명 형식으로 호출 할 수 있습니다.
Configuring the Run Loop
실행 루프 구성
Before you run a run loop on a secondary thread, you must add at least one input source or timer to it. If a run loop does not have any sources to monitor, it exits immediately when you try to run it. For examples of how to add sources to a run loop, see “Configuring Run Loop Sources.”
당신이 보조 스레드에서 실행 루프를 실행하기 전에, 당신은 적어도 하나의 입력 소스 또는 타이머를 추가해야합니다. 당신이 그것을 실행하려고 즉시 실행 루프가 어떤 소스를 모니터링하지 않는 경우 종료합니다. 운전 루프에 소스를 추가하는 방법에 대한 예를 들어, "실행 루프 소스 구성"을 참조하십시오.
In addition to installing sources, you can also install run loop observers and use them to detect different execution stages of the run loop. To install a run loop observer, you create a CFRunLoopObserverRef opaque type and use the CFRunLoopAddObserver function to add it to your run loop. Run loop observers must be created using Core Foundation, even for Cocoa applications.
소스를 설치하는 이외에, 당신은 또한 루프 관찰자를 실행 설치하고 실행 루프의 다른 실행 단계를 감지하는 데 사용할 수 있습니다. 운전 루프 관측기를 설치하려면, 당신은 CFRunLoopObserverRef 불투명 한 유형을 작성하고 실행 루프에 추가 CFRunLoopAddObserver 함수를 사용합니다. 실행 루프 관찰자조차 코코아 응용 프로그램, 코어 파운데이션을 사용하여 작성해야합니다.
Listing 3-1 shows the main routine for a thread that attaches a run loop observer to its run loop. The purpose of the example is to show you how to create a run loop observer, so the code simply sets up a run loop observer to monitor all run loop activities. The basic handler routine (not shown) simply logs the run loop activity as it processes the timer requests.
목록 3-1은 실행 루프에 실행 된 루프 관측기를 연결 스레드에 대한 주요 루틴을 보여줍니다.예제의 목적은 어떻게 실행 루프 관측기를 만드는 방법을 보여주는 것입니다, 코드는 단순히 모든 실행 루프 활동을 모니터링하는 실행 루프 관측기를 설정하므로. 이 타이머 요청을 처리 할 때 기본 핸들러 루틴 (미도시)는 단순히 실행 루프 활동을 기록합니다.
Listing 3-1 Creating a run loop observer
- (void)threadMain |
{ |
// The application uses garbage collection, so no autorelease pool is needed. |
NSRunLoop* myRunLoop = [NSRunLoop currentRunLoop]; |
// Create a run loop observer and attach it to the run loop. |
CFRunLoopObserverContext context = {0, self, NULL, NULL, NULL}; |
CFRunLoopObserverRef observer = CFRunLoopObserverCreate(kCFAllocatorDefault, |
kCFRunLoopAllActivities, YES, 0, &myRunLoopObserver, &context); |
if (observer) |
{ |
CFRunLoopRef cfLoop = [myRunLoop getCFRunLoop]; |
CFRunLoopAddObserver(cfLoop, observer, kCFRunLoopDefaultMode); |
} |
// Create and schedule the timer. |
[NSTimer scheduledTimerWithTimeInterval:0.1 target:self |
selector:@selector(doFireTimer:) userInfo:nil repeats:YES]; |
NSInteger loopCount = 10; |
do |
{ |
// Run the run loop 10 times to let the timer fire. |
[myRunLoop runUntilDate:[NSDate dateWithTimeIntervalSinceNow:1]]; |
loopCount--; |
} |
while (loopCount); |
} |
When configuring the run loop for a long-lived thread, it is better to add at least one input source to receive messages. Although you can enter the run loop with only a timer attached, once the timer fires, it is typically invalidated, which would then cause the run loop to exit. Attaching a repeating timer could keep the run loop running over a longer period of time, but would involve firing the timer periodically to wake your thread, which is effectively another form of polling. By contrast, an input source waits for an event to happen, keeping your thread asleep until it does.
수명이 긴 스레드의 실행 루프를 구성 할 때, 메시지를 수신하는 적어도 하나의 입력 소스를 추가하는 것이 좋습니다. 당신은 타이머 번 타이머 화재, 부착 된 실행 루프를 입력 할 수 있지만, 일반적으로 다음 종료 실행 루프를 발생할 것이라고하는 무효화됩니다.반복 타이머를 부착하는 것은 시간의 긴 기간 동안 실행되는 실행 루프를 유지할 수 있지만, 효율적으로 폴링 또 다른 형태의 당신의 스레드를 깨워 주기적으로 타이머를 발사 포함됩니다. 대조적으로, 입력 소스는 않게 될 때까지 잠의 스레드를 유지, 발생하는 이벤트를 기다립니다.
Starting the Run Loop
실행 루프 시작
Starting the run loop is necessary only for the secondary threads in your application. A run loop must have at least one input source or timer to monitor. If one is not attached, the run loop exits immediately.
런 루프를 시작하는 경우에만 응용 프로그램에서 보조 스레드가 필요합니다.런 루프는 적어도 하나의 입력 소스 또는 모니터링 할 타이머를 가지고 있어야합니다. 하나가 연결되어 있지 않은 경우, 실행 루프가 종료 즉시.
There are several ways to start the run loop, including the following:
다음과 같은 실행 루프를 시작하는 몇 가지 방법이 있습니다 :
Unconditionally
무조건With a set time limit
설정된 시간 한도In a particular mode
특정 모드에서
Entering your run loop unconditionally is the simplest option, but it is also the least desirable. Running your run loop unconditionally puts the thread into a permanent loop, which gives you very little control over the run loop itself. You can add and remove input sources and timers, but the only way to stop the run loop is to kill it. There is also no way to run the run loop in a custom mode.
러닝 루프를 입력하면 무조건 간단한 방법이지만, 그것은 또한 가장 바람직하다. 러닝 루프를 실행하면 무조건 당신에게 실행 루프 자체에 거의 제어 할 수있는 영구 루프에 실을 넣습니다. 당신은 추가 및 제거 입력 소스 및 타이머,하지만 실행 루프를 막을 수있는 유일한 방법은 그것을 죽일 것입니다 수 있습니다.사용자 정의 모드에서 실행 루프를 실행하는 방법은 없습니다.
Instead of running a run loop unconditionally, it is better to run the run loop with a timeout value. When you use a timeout value, the run loop runs until an event arrives or the allotted time expires. If an event arrives, that event is dispatched to a handler for processing and then the run loop exits. Your code can then restart the run loop to handle the next event. If the allotted time expires instead, you can simply restart the run loop or use the time to do any needed housekeeping.
대신 무조건 실행 루프를 실행, 그것은 시간 초과 값과 실행 루프를 실행하는 것이 좋습니다. 당신이 제한 시간 값을 사용하면, 이벤트가 도착할 때까지 실행 루프를 실행하거나 할당 된 시간이 만료됩니다.이벤트가 도착하면 그 이벤트 처리를위한 핸들러하고 실행 루프가 종료로 전달됩니다. 귀하의 코드는 다음 이벤트를 처리하는 실행 루프를 다시 시작할 수 있습니다.할당 된 시간 대신 만료되면, 당신은 단순히 실행 루프를 다시 시작하거나 필요한 모든 하우스 키핑을 할 수있는 시간을 사용할 수 있습니다.
In addition to a timeout value, you can also run your run loop using a specific mode. Modes and timeout values are not mutually exclusive and can both be used when starting a run loop. Modes limit the types of sources that deliver events to the run loop and are described in more detail in “Run Loop Modes.”
시간 제한 값 이외에, 당신은 또한 특정 모드를 사용하여 실행 된 루프를 실행할 수 있습니다. 모드와 타임 아웃 값은 상호 배타적이지하고 실행 루프를 시작할 때 모두 사용할 수 있습니다. 모드는 런 루프에 이벤트를 전달하고에 자세히 설명되어 소스의 유형을 제한하는 "실행 루프 모드."
Listing 3-2 shows a skeleton version of a thread’s main entry routine. The key portion of this example shows the basic structure of a run loop. In essence, you add your input sources and timers to the run loop and then repeatedly call one of the routines to start the run loop. Each time the run loop routine returns, you check to see if any conditions have arisen that might warrant exiting the thread. The example uses the Core Foundation run loop routines so that it can check the return result and determine why the run loop exited. You could also use the methods of the NSRunLoop class to run the run loop in a similar manner if you are using Cocoa and do not need to check the return value. (For an example of a run loop that calls methods of the NSRunLoop class, see Listing 3-14.)
목록 3-2 스레드의 주 진입 루틴의 뼈대 버전을 보여줍니다. 이 예제의 핵심 부분은 실행 루프의 기본 구조를 보여줍니다. 본질적으로, 당신은 실행 루프에 입력 소스 및 타이머를 추가 한 다음 반복 실행 루프를 시작하는 루틴 중 하나를 호출합니다.런 루프 루틴을 반환 할 때마다, 당신은 어떤 조건이 스레드를 종료 보증 수 있다는 생겨이 있는지 확인하십시오. 그것은 반환 결과를 확인하고 실행 루프가 종료 이유를 확인할 수 있도록 예제는 코어 파운데이션 실행 루프 루틴을 사용합니다. 당신은 또한 코코아를 사용하고 반환 값을 확인할 필요가없는 경우 비슷한 방식으로 실행 루프를 실행 NSRunLoop 클래스의 메서드를 사용할 수 있습니다. (NSRunLoop 클래스의 메서드를 호출하는 실행 루프의 예를 들어, Listing 3-14을 참조하십시오.)
Listing 3-2 Running a run loop
- (void)skeletonThreadMain |
{ |
// Set up an autorelease pool here if not using garbage collection. |
BOOL done = NO; |
// Add your sources or timers to the run loop and do any other setup. |
do |
{ |
// Start the run loop but return after each source is handled. |
SInt32 result = CFRunLoopRunInMode(kCFRunLoopDefaultMode, 10, YES); |
// If a source explicitly stopped the run loop, or if there are no |
// sources or timers, go ahead and exit. |
if ((result == kCFRunLoopRunStopped) || (result == kCFRunLoopRunFinished)) |
done = YES; |
// Check for any other exit conditions here and set the |
// done variable as needed. |
} |
while (!done); |
// Clean up code here. Be sure to release any allocated autorelease pools. |
} |
It is possible to run a run loop recursively. In other words, you can call CFRunLoopRun, CFRunLoopRunInMode, or any of the NSRunLoop methods for starting the run loop from within the handler routine of an input source or timer. When doing so, you can use any mode you want to run the nested run loop, including the mode in use by the outer run loop.
그것은 재귀 적으로 실행 루프를 실행할 수 있습니다. 즉, 당신은 CFRunLoopRun, CFRunLoopRunInMode, 또는 입력 소스 또는 타이머 핸들러 루틴 내에서 실행 루프를 시작하기위한 NSRunLoop 방법 중 하나를 호출 할 수 있습니다. 이렇게하면, 당신은 외부 실행 루프에서 사용하는 모드를 포함하는 중첩 된 실행 루프를 실행하고자하는 모드를 사용할 수 있습니다.
Exiting the Run Loop
실행 루프를 종료
There are two ways to make a run loop exit before it has processed an event:
이 이벤트를 처리하기 전에 실행 루프 출구를 만들기 위해 두 가지 방법이 있습니다 :
Configure the run loop to run with a timeout value.
시간 초과 값으로 실행하는 실행 루프를 구성합니다.Tell the run loop to stop.
중지 실행 루프를 말한다.
Using a timeout value is certainly preferred, if you can manage it. Specifying a timeout value lets the run loop finish all of its normal processing, including delivering notifications to run loop observers, before exiting.
당신이 그것을 관리 할 수있는 경우 시간 초과 값을 사용하면 확실히 좋습니다.시간 초과 값을 지정하면 실행 루프가 종료하기 전에 루프 관찰자를 실행하는 알림을 제공하는 등의 정상적인 처리를 모두 완료 할 수 있습니다.
Stopping the run loop explicitly with the CFRunLoopStop function produces a result similar to a timeout. The run loop sends out any remaining run-loop notifications and then exits. The difference is that you can use this technique on run loops you started unconditionally.
CFRunLoopStop 기능을 명시 적으로 실행 루프를 중지하면 시간 초과로 유사한 결과를 생성합니다.런 루프는 남아있는 실행 루프 알림 및 다음 종료를 보냅니다.차이점은 당신이 무조건 시작 실행 루프에서이 기술을 사용할 수 있다는 것입니다.
Although removing a run loop’s input sources and timers may also cause the run loop to exit, this is not a reliable way to stop a run loop. Some system routines add input sources to a run loop to handle needed events. Because your code might not be aware of these input sources, it would be unable to remove them, which would prevent the run loop from exiting.
운전 루프의 입력 소스와 타이머를 제거하는 것이 아니라 실행 루프가 종료 될 수 있지만,이 런 루프를 막을 수있는 확실한 방법이 아닙니다. 일부 시스템 루틴은 필요한 이벤트를 처리 할 수있는 실행 루프에 입력 소스를 추가합니다. 코드가 이러한 입력 소스를 인식하지 못할 수 있으므로, 그것은 종료에서 실행 루프를 방지 할 그들을 제거 할 수없는 것입니다.
Thread Safety and Run Loop Objects
스레드 안전 및 실행 루프 개체
Thread safety varies depending on which API you are using to manipulate your run loop. The functions in Core Foundation are generally thread-safe and can be called from any thread. If you are performing operations that alter the configuration of the run loop, however, it is still good practice to do so from the thread that owns the run loop whenever possible.
스레드 안전은 당신의 런 루프를 조작하는 데 사용되는 API에 따라 달라집니다. 코어 파운데이션의 기능은 일반적으로 스레드 안전하며 모든 스레드에서 호출 할 수 있습니다. 당신이 실행 된 루프의 구성을 변경 작업을 수행하는 경우, 그러나, 그것은 여전히 가능 런 루프마다를 소유 한 스레드에서 그렇게하는 것이 좋습니다.
The Cocoa NSRunLoop class is not as inherently thread safe as its Core Foundation counterpart. If you are using the NSRunLoop class to modify your run loop, you should do so only from the same thread that owns that run loop. Adding an input source or timer to a run loop belonging to a different thread could cause your code to crash or behave in an unexpected way.
코코아 NSRunLoop 클래스는 핵심 재단 대응만큼 본질적으로 스레드로부터 안전하지 않습니다. 당신이 실행 루프를 수정하는 NSRunLoop 클래스를 사용하는 경우, 당신은 실행되는 루프를 소유하고 동일한 스레드에서 그렇게해야한다.다른 스레드에 속한 런 루프에 입력 소스 또는 타이머를 추가하면 예상치 못한 방식으로 충돌하거나 작동하도록 코드를 발생할 수 있습니다.
Configuring Run Loop Sources
런 루프 소스 구성
The following sections show examples of how to set up different types of input sources in both Cocoa and Core Foundation.
다음 섹션에서는 코코아 및 핵심 기초 모두 입력 소스의 다른 유형을 설정하는 방법의 예를 보여줍니다.
Defining a Custom Input Source
사용자 정의 입력 소스를 정의
Creating a custom input source involves defining the following:
사용자 정의 입력 소스를 작성하면 다음과 같은 정의를 포함한다 :
The information you want your input source to process.
당신이 입력 소스가 처리 할 정보를 제공합니다.A scheduler routine to let interested clients know how to contact your input source.
스케줄러 루틴 관심이 클라이언트가 입력 소스를 접촉하는 방법을 알려 수 있습니다.A handler routine to perform requests sent by any clients.
모든 클라이언트에서 보낸 요청을 수행하는 처리기 루틴.A cancellation routine to invalidate your input source.
입력 소스를 무효화 취소 루틴.
Because you create a custom input source to process custom information, the actual configuration is designed to be flexible. The scheduler, handler, and cancellation routines are the key routines you almost always need for your custom input source. Most of the rest of the input source behavior, however, happens outside of those handler routines. For example, it is up to you to define the mechanism for passing data to your input source and for communicating the presence of your input source to other threads.
당신이 사용자 정의 정보를 처리하는 사용자 정의 입력 소스를 만들기 때문에, 실제 구성이 유연하도록 설계되었습니다.스케줄러, 처리기 및 취소 루틴은 당신은 거의 항상 사용자 정의 입력 소스에 필요한 핵심 루틴입니다.입력 소스 행동의 나머지의 대부분은, 그러나, 그 핸들러 루틴의 외부에서 발생합니다. 예를 들어, 입력 소스에 데이터를 전달하는 다른 스레드에 입력 소스의 존재를 통신하기위한 메커니즘을 정의하기 위해 당신에게 달려있다.
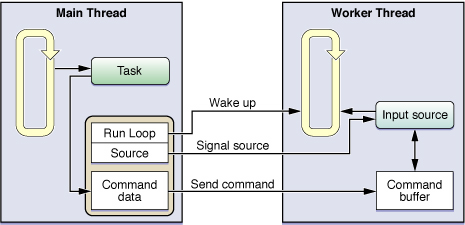
Figure 3-2 shows a sample configuration of a custom input source. In this example, the application’s main thread maintains references to the input source, the custom command buffer for that input source, and the run loop on which the input source is installed. When the main thread has a task it wants to hand off to the worker thread, it posts a command to the command buffer along with any information needed by the worker thread to start the task. (Because both the main thread and the input source of the worker thread have access to the command buffer, that access must be synchronized.) Once the command is posted, the main thread signals the input source and wakes up the worker thread’s run loop. Upon receiving the wake up command, the run loop calls the handler for the input source, which processes the commands found in the command buffer.
그림 3-2은 사용자 정의 입력 소스의 샘플 구성을 보여줍니다. 이 예제에서는 응용 프로그램의 주 스레드는 입력 소스가 입력 소스에 대한 사용자 지정 명령 버퍼, 입력 소스가 설치되어있는 실행 루프에 대한 참조를 유지합니다.작업을 시작하기 위해 작업자 스레드에 의해 필요한 정보와 함께 주 스레드는 작업자 스레드에 넘겨 원하는 작업을, 그것이 게시물 명령 버퍼에 명령을 실행합니다. 명령이 게시되면 (메인 스레드와 작업자 스레드의 입력 소스를 모두 명령어 버퍼에 액세스 할 수 있기 때문에, 그 액세스를 동기화해야합니다.), 메인 쓰레드는 입력 소스 신호와 작업자 스레드의 실행 루프 일어난다. 명령의 Wake Up을 수신하면, 실행 루프는 명령어 버퍼에있는 명령을 처리하는 입력 소스에 대한 핸들러를 호출합니다.
The following sections explain the implementation of the custom input source from the preceding figure and show the key code you would need to implement.
다음 절에는 위의 그림에서 사용자 정의 입력 소스의 구현을 설명하고 구현해야 할 키 코드를 보여줍니다.
Defining the Input Source
입력 소스를 정의
Defining a custom input source requires the use of Core Foundation routines to configure your run loop source and attach it to a run loop. Although the basic handlers are C-based functions, that does not preclude you from writing wrappers for those functions and using Objective-C or C++ to implement the body of your code.
사용자 정의 입력 소스를 정의하면 실행 루프 소스를 구성하고 실행 루프에 연결하는 핵심 재단 루틴의 사용을 필요로합니다.기본 핸들러는 C 기반 기능이지만, 그 해당 함수에 대한 래퍼를 작성하고 사용하는 것을 배제하지 않는다 오브젝티브-C 또는 C + + 코드의 몸을 구현합니다.
The input source introduced in Figure 3-2 uses an Objective-C object to manage a command buffer and coordinate with the run loop. Listing 3-3 shows the definition of this object. The RunLoopSource object manages a command buffer and uses that buffer to receive messages from other threads. This listing also shows the definition of the RunLoopContext object, which is really just a container object used to pass a RunLoopSource object and a run loop reference to the application’s main thread.
그림 3-2에 소개 된 입력 소스는 명령 버퍼를 관리하고 실행 루프를 조정하는 오브젝티브-C 객체를 사용합니다. 목록 3-3은이 객체의 정의를 보여줍니다.RunLoopSource 개체는 명령어 버퍼를 관리하고 다른 스레드에서 메시지를 수신하는 버퍼를 사용합니다. 이 목록은 정말 RunLoopSource 개체와 응용 프로그램의 주 스레드에 실행 된 루프 참조를 전달하는 데 사용되는 단지 컨테이너 개체입니다 RunLoopContext 개체의 정의를 보여줍니다.
Listing 3-3 The custom input source object definition
@interface RunLoopSource : NSObject |
{ |
CFRunLoopSourceRef runLoopSource; |
NSMutableArray* commands; |
} |
- (id)init; |
- (void)addToCurrentRunLoop; |
- (void)invalidate; |
// Handler method |
- (void)sourceFired; |
// Client interface for registering commands to process |
- (void)addCommand:(NSInteger)command withData:(id)data; |
- (void)fireAllCommandsOnRunLoop:(CFRunLoopRef)runloop; |
@end |
// These are the CFRunLoopSourceRef callback functions. |
void RunLoopSourceScheduleRoutine (void *info, CFRunLoopRef rl, CFStringRef mode); |
void RunLoopSourcePerformRoutine (void *info); |
void RunLoopSourceCancelRoutine (void *info, CFRunLoopRef rl, CFStringRef mode); |
// RunLoopContext is a container object used during registration of the input source. |
@interface RunLoopContext : NSObject |
{ |
CFRunLoopRef runLoop; |
RunLoopSource* source; |
} |
@property (readonly) CFRunLoopRef runLoop; |
@property (readonly) RunLoopSource* source; |
- (id)initWithSource:(RunLoopSource*)src andLoop:(CFRunLoopRef)loop; |
@end |
Although the Objective-C code manages the custom data of the input source, attaching the input source to a run loop requires C-based callback functions. The first of these functions is called when you actually attach the run loop source to your run loop, and is shown in Listing 3-4. Because this input source has only one client (the main thread), it uses the scheduler function to send a message to register itself with the application delegate on that thread. When the delegate wants to communicate with the input source, it uses the information in RunLoopContext object to do so.
목표-C 코드는 입력 소스의 사용자 지정 데이터를 관리하지만, 실행 루프에 입력 소스를 연결하면 C-기반의 콜백 함수가 필요합니다. 이 함수의 첫 번째는 사용자가 실제로 실행 루프로 실행 루프 소스를 연결할 때 호출되며, 3-4 목록에 표시됩니다. 이 입력 소스는 하나의 클라이언트 (메인 스레드)를 가지고 있기 때문에, 그 스레드에서 응용 프로그램 대리자 자체를 등록하는 메시지를 보낼 스케줄러 함수를 사용합니다. 대리자가 입력 소스와 통신하고자 할 때, 그것은 그렇게 할 RunLoopContext 객체에 정보를 사용합니다.
Listing 3-4 Scheduling a run loop source
void RunLoopSourceScheduleRoutine (void *info, CFRunLoopRef rl, CFStringRef mode) |
{ |
RunLoopSource* obj = (RunLoopSource*)info; |
AppDelegate* del = [AppDelegate sharedAppDelegate]; |
RunLoopContext* theContext = [[RunLoopContext alloc] initWithSource:obj andLoop:rl]; |
[del performSelectorOnMainThread:@selector(registerSource:) |
withObject:theContext waitUntilDone:NO]; |
} |
One of the most important callback routines is the one used to process custom data when your input source is signaled. Listing 3-5 shows the perform callback routine associated with the RunLoopSource object. This function simply forwards the request to do the work to the sourceFired method, which then processes any commands present in the command buffer.
가장 중요한 콜백 루틴 중 하나는 입력 소스가 신호를하면 사용자 지정 데이터를 처리하는 데 사용되는 하나입니다. 목록 3-5은 RunLoopSource 객체와 연관된 콜백 루틴을 수행 보여줍니다. 이 함수는 단순히 요청을 전달 다음 명령어 버퍼에 존재하는 모든 명령을 처리 sourceFired 방법으로 작업을 수행합니다.
Listing 3-5 Performing work in the input source
void RunLoopSourcePerformRoutine (void *info) |
{ |
RunLoopSource* obj = (RunLoopSource*)info; |
[obj sourceFired]; |
} |
If you ever remove your input source from its run loop using the CFRunLoopSourceInvalidate function, the system calls your input source’s cancellation routine. You can use this routine to notify clients that your input source is no longer valid and that they should remove any references to it. Listing 3-6 shows the cancellation callback routine registered with the RunLoopSource object. This function sends another RunLoopContext object to the application delegate, but this time asks the delegate to remove references to the run loop source.
당신은 CFRunLoopSourceInvalidate 기능을 사용하여 실행 루프에서 입력 소스를 제거하면 시스템은 입력 소스의 취소 루틴을 호출합니다. 당신은 입력 소스가 더 이상 유효하지 않으며 그들이에 대한 참조를 제거해야한다는 것을 클라이언트에게 알리도록하려면이 루틴을 사용할 수 있습니다. 목록 3-6 RunLoopSource 개체에 등록 취소 콜백 루틴을 보여줍니다. 이 기능은 응용 프로그램 대리자에 다른 RunLoopContext 객체를 보내지 만 이번에는 실행 루프 소스에 대한 참조를 제거하는 대리자를 요청합니다.
Listing 3-6 Invalidating an input source
void RunLoopSourceCancelRoutine (void *info, CFRunLoopRef rl, CFStringRef mode) |
{ |
RunLoopSource* obj = (RunLoopSource*)info; |
AppDelegate* del = [AppDelegate sharedAppDelegate]; |
RunLoopContext* theContext = [[RunLoopContext alloc] initWithSource:obj andLoop:rl]; |
[del performSelectorOnMainThread:@selector(removeSource:) |
withObject:theContext waitUntilDone:YES]; |
} |
Installing the Input Source on the Run Loop
운전 루프에 입력 소스를 설치
Listing 3-7 shows the init and addToCurrentRunLoop methods of the RunLoopSource class. The init method creates the CFRunLoopSourceRef opaque type that must actually be attached to the run loop. It passes the RunLoopSource object itself as the contextual information so that the callback routines have a pointer to the object. Installation of the input source does not occur until the worker thread invokes the addToCurrentRunLoop method, at which point theRunLoopSourceScheduleRoutine callback function is called. Once the input source is added to the run loop, the thread can run its run loop to wait on it.
목록 3-7 RunLoopSource 클래스의 초기화 및 addToCurrentRunLoop 방법을 보여줍니다.init 메소드는 실제로 실행 루프에 연결해야합니다 CFRunLoopSourceRef 불투명 한 형식을 만듭니다.콜백 루틴 개체에 대한 포인터를 가지고 그래서 컨텍스트 정보로 RunLoopSource 객체 자체를 전달합니다.작업자 스레드 포인트 theRunLoopSourceScheduleRoutine 콜백 함수가 호출되는 addToCurrentRunLoop 메서드를 호출 할 때까지 입력 소스의 설치는 발생하지 않습니다. 입력 소스가 실행 루프에 추가되면, 쓰레드는 기다림의 실행 루프를 실행할 수 있습니다.
Listing 3-7 Installing the run loop source
- (id)init |
{ |
CFRunLoopSourceContext context = {0, self, NULL, NULL, NULL, NULL, NULL, |
&RunLoopSourceScheduleRoutine, |
RunLoopSourceCancelRoutine, |
RunLoopSourcePerformRoutine}; |
runLoopSource = CFRunLoopSourceCreate(NULL, 0, &context); |
commands = [[NSMutableArray alloc] init]; |
return self; |
} |
- (void)addToCurrentRunLoop |
{ |
CFRunLoopRef runLoop = CFRunLoopGetCurrent(); |
CFRunLoopAddSource(runLoop, runLoopSource, kCFRunLoopDefaultMode); |
} |
Coordinating with Clients of the Input Source
입력 소스의 클라이언트와 협조
For your input source to be useful, you need to manipulate it and signal it from another thread. The whole point of an input source is to put its associated thread to sleep until there is something to do. That fact necessitates having other threads in your application know about the input source and have a way to communicate with it.
입력 소스가 유용하려면, 당신은 그것을 조작하고 다른 스레드에서 신호를해야합니다.입력 소스의 요점은 할 수있는 뭔가가있을 때까지 잠을 관련 스레드를 넣어하는 것입니다. 그 사실이 응용 프로그램의 다른 스레드가 입력 소스에 대해 알고와 통신 할 수있는 방법이 필요 필요로한다.
One way to notify clients about your input source is to send out registration requests when your input source is first installed on its run loop. You can register your input source with as many clients as you want, or you can simply register it with some central agency that then vends your input source to interested clients. Listing 3-8 shows the registration method defined by the application delegate and invoked when the RunLoopSource object’s scheduler function is called. This method receives the RunLoopContext object provided by the RunLoopSource object and adds it to its list of sources. This listing also shows the routine used to unregister the input source when it is removed from its run loop.
입력 소스에 대해 클라이언트에 통지하는 한 가지 방법은 입력 소스가 먼저 실행 루프에 설치되어있는 경우 등록 요청을 보내는 것입니다. 당신이 원하는대로 당신은 많은 클라이언트와 입력 소스를 등록 할 수 있습니다, 또는 당신은 단순히 그 관심이 클라이언트에 입력 소스를 vends 일부 중앙 기관에 등록 할 수 있습니다. 목록 3-8 응용 프로그램 대리자에 의해 정의 및 RunLoopSource 객체의 스케줄러 함수가 호출 될 때 호출되는 등록 방법을 보여줍니다. 이 방법은 RunLoopSource 개체에서 제공 RunLoopContext 객체를 수신하고 소스 목록에 추가합니다. 이 목록은 또한 그것의 실행 루프에서 제거 될 때 입력 소스 등록을 취소하는 데 사용되는 루틴을 보여줍니다.
Listing 3-8 Registering and removing an input source with the application delegate
- (void)registerSource:(RunLoopContext*)sourceInfo; |
{ |
[sourcesToPing addObject:sourceInfo]; |
} |
- (void)removeSource:(RunLoopContext*)sourceInfo |
{ |
id objToRemove = nil; |
for (RunLoopContext* context in sourcesToPing) |
{ |
if ([context isEqual:sourceInfo]) |
{ |
objToRemove = context; |
break; |
} |
} |
if (objToRemove) |
[sourcesToPing removeObject:objToRemove]; |
} |
Signaling the Input Source
입력 소스 신호
After it hands off its data to the input source, a client must signal the source and wake up its run loop. Signaling the source lets the run loop know that the source is ready to be processed. And because the thread might be asleep when the signal occurs, you should always wake up the run loop explicitly. Failing to do so might result in a delay in processing the input source.
이 입력 소스로 데이터를 넘겨 한 후, 클라이언트는 소스 신호 및 실행 루프를 깨워해야합니다.소스 신호는 실행 루프 소스를 처리 할 준비가되어 있음을 알 수 있습니다.신호가 발생하면 스레드가 잠들 수 있기 때문에, 당신은 항상 명시 적으로 실행 루프를 깨워해야합니다. 이렇게하지 않으면 입력 소스를 처리 지연 될 수 있습니다.
Listing 3-9 shows the fireCommandsOnRunLoop method of the RunLoopSource object. Clients invoke this method when they are ready for the source to process the commands they added to the buffer.
목록 3-9 RunLoopSource 개체의 fireCommandsOnRunLoop 방법을 보여줍니다. 그들이 버퍼에 추가 된 명령을 처리하는 소스에 대한 준비가되면 클라이언트는이 메서드를 호출합니다.
Listing 3-9 Waking up the run loop
- (void)fireCommandsOnRunLoop:(CFRunLoopRef)runloop |
{ |
CFRunLoopSourceSignal(runLoopSource); |
CFRunLoopWakeUp(runloop); |
} |
Configuring Timer Sources
타이머 소스 구성
To create a timer source, all you have to do is create a timer object and schedule it on your run loop. In Cocoa, you use the NSTimer class to create new timer objects, and in Core Foundation you use the CFRunLoopTimerRef opaque type. Internally, the NSTimer class is simply an extension of Core Foundation that provides some convenience features, like the ability to create and schedule a timer using the same method.
타이머 소스를 만들려면, 당신이해야 할 모든 타이머 개체를 생성하고 실행 루프를 예약합니다. 코코아, 당신은 새로운 타이머 개체를 만들 수 NSTimer 클래스를 사용하고 코어 재단에서 당신은 CFRunLoopTimerRef 불투명 한 형식을 사용합니다. 내부적으로 NSTimer 클래스는 단순히 동일한 방법을 사용하여 타이머를 생성하고 예약 할 수있는 능력과 같은 몇 가지 편의 기능을 제공하는 코어 파운데이션의 확장입니다.
In Cocoa, you can create and schedule a timer all at once using either of these class methods:
코코아에서는 이러한 클래스 메소드 중 하나를 사용하여 한 번에 타이머를 생성하고 예약 할 수 있습니다 :
These methods create the timer and add it to the current thread’s run loop in the default mode (NSDefaultRunLoopMode). You can also schedule a timer manually if you want by creating your NSTimer object and then adding it to the run loop using the addTimer:forMode: method of NSRunLoop. Both techniques do basically the same thing but give you different levels of control over the timer’s configuration. For example, if you create the timer and add it to the run loop manually, you can do so using a mode other than the default mode. Listing 3-10 shows how to create timers using both techniques. The first timer has an initial delay of 1 second but then fires regularly every 0.1 seconds after that. The second timer begins firing after an initial 0.2 second delay and then fires every 0.2 seconds after that.
이러한 메서드는 타이머를 생성하고 기본 모드 (NSDefaultRunLoopMode)에서 현재 스레드의 실행 루프를 추가합니다. 당신은 당신이 원하는 경우 또한 NSTimer 객체를 생성하여 수동으로 타이머를 예약하고 addTimer를 사용하여 실행 된 루프에 추가 할 수 있습니다 forMode : NSRunLoop의 방법. 두 기술은 기본적으로 같은 일을하지만, 당신이 타이머의 구성을 통해 여러 가지 수준의 제어를 제공합니다. 타이머를 생성하고 수동으로 실행 루프를 추가하는 경우 예를 들어, 기본 모드 이외의 모드를 사용하여 수행 할 수 있습니다. 목록 3-10는 두 기술을 사용하여 타이머를 만드는 방법을 보여줍니다.첫 번째 타이머는 1 초 초기 지연을 가지고하지만 그 후 정기적으로 모든 0.1 초 발생합니다.두 번째 타이머는 초기 0.2 초 지연 후 발사 시작하고 그 후 매 0.2 초 발생합니다.
Listing 3-10 Creating and scheduling timers using NSTimer
NSRunLoop* myRunLoop = [NSRunLoop currentRunLoop]; |
// Create and schedule the first timer. |
NSDate* futureDate = [NSDate dateWithTimeIntervalSinceNow:1.0]; |
NSTimer* myTimer = [[NSTimer alloc] initWithFireDate:futureDate |
interval:0.1 |
target:self |
selector:@selector(myDoFireTimer1:) |
userInfo:nil |
repeats:YES]; |
[myRunLoop addTimer:myTimer forMode:NSDefaultRunLoopMode]; |
// Create and schedule the second timer. |
[NSTimer scheduledTimerWithTimeInterval:0.2 |
target:self |
selector:@selector(myDoFireTimer2:) |
userInfo:nil |
repeats:YES]; |
Listing 3-11 shows the code needed to configure a timer using Core Foundation functions. Although this example does not pass any user-defined information in the context structure, you could use this structure to pass around any custom data you needed for your timer. For more information about the contents of this structure, see its description in CFRunLoopTimer Reference.
목록 3-11는 코드가 코어 파운데이션 함수를 사용하여 타이머를 구성하는 데 필요한 보여줍니다. 이 예제 컨텍스트 구조에서 사용자 정의 된 정보를 전달하지 않지만, 당신은 당신의 타이머에 필요한 모든 사용자 지정 데이터 주위에 전달하기 위해이 구조를 사용할 수 있습니다. 이 구조체의 내용에 대한 자세한 내용은 CFRunLoopTimer 참조 설명서에서 해당 설명을 참조하십시오.
Listing 3-11 Creating and scheduling a timer using Core Foundation
CFRunLoopRef runLoop = CFRunLoopGetCurrent(); |
CFRunLoopTimerContext context = {0, NULL, NULL, NULL, NULL}; |
CFRunLoopTimerRef timer = CFRunLoopTimerCreate(kCFAllocatorDefault, 0.1, 0.3, 0, 0, |
&myCFTimerCallback, &context); |
CFRunLoopAddTimer(runLoop, timer, kCFRunLoopCommonModes); |
Configuring a Port-Based Input Source
포트 기반 입력 소스 구성
Both Cocoa and Core Foundation provide port-based objects for communicating between threads or between processes. The following sections show you how to set up port communication using several different types of ports.
코코아 및 핵심 기초는 모두 스레드 간 또는 프로세스 간 통신을위한 포트 기반 개체를 제공합니다.다음 섹션에서는 포트의 여러 가지 유형을 사용하여 포트 통신을 설정하는 방법을 보여줍니다.
Configuring an NSMachPort Object
NSMachPort 개체 구성
To establish a local connection with an NSMachPort object, you create the port object and add it to your primary thread's run loop. When launching your secondary thread, you pass the same object to your thread's entry-point function. The secondary thread can use the same object to send messages back to your primary thread.
NSMachPort 객체에 로컬 연결을 설정하려면, 포트 개체를 만들고 기본 스레드의 실행 루프에 추가합니다. 보조 스레드를 시작할 때, 당신은 당신의 스레드의 엔트리 포인트 함수에 동일한 개체를 전달합니다.보조 스레드는 주 스레드에 메시지를 다시 보낼 동일한 개체를 사용할 수 있습니다.
Implementing the Main Thread Code
메인 스레드 코드를 구현
Listing 3-12 shows the primary thread code for launching a secondary worker thread. Because the Cocoa framework performs many of the intervening steps for configuring the port and run loop, the launchThread method is noticeably shorter than its Core Foundation equivalent (Listing 3-17); however, the behavior of the two is nearly identical. One difference is that instead of sending the name of the local port to the worker thread, this method sends the NSPort object directly.
목록 3-12 보조 작업자 스레드를 시작하기위한 기본 스레드 코드를 보여줍니다.코코아 프레임 워크 포트 및 실행 루프를 구성하기위한 중간 단계의 많은 수행하기 때문에, launchThread 방법의 핵심 재단에 해당한다 (Listing 3-17)보다 눈에 띄게 짧아하지만, 두 가지의 동작은 거의 동일합니다. 한 가지 차이점은 대신 작업자 스레드 로컬 포트의 이름을 보내는이 방법은 직접 NSPort 객체를 전송하는 것입니다.
Listing 3-12 Main thread launch method
- (void)launchThread |
{ |
NSPort* myPort = [NSMachPort port]; |
if (myPort) |
{ |
// This class handles incoming port messages. |
[myPort setDelegate:self]; |
// Install the port as an input source on the current run loop. |
[[NSRunLoop currentRunLoop] addPort:myPort forMode:NSDefaultRunLoopMode]; |
// Detach the thread. Let the worker release the port. |
[NSThread detachNewThreadSelector:@selector(LaunchThreadWithPort:) |
toTarget:[MyWorkerClass class] withObject:myPort]; |
} |
} |
In order to set up a two-way communications channel between your threads, you might want to have the worker thread send its own local port to your main thread in a check-in message. Receiving the check-in message lets your main thread know that all went well in launching the second thread and also gives you a way to send further messages to that thread.
귀하의 스레드 간의 양방향 통신 채널을 설정하기 위해서는, 당신은 작업자 스레드 체크인 메시지에서 주 스레드에 자신의 로컬 포트를 전송하도록 할 수 있습니다. 받은 체크에 메시지를 메인 스레드가 모두 두 번째 스레드를 실행에 잘 갔다 것을 알 수 있습니다 또한 당신에게 해당 스레드에 추가 메시지를 보낼 수있는 방법을 제공합니다.에게
Listing 3-13 shows the handlePortMessage: method for the primary thread. This method is called when data arrives on the thread's own local port. When a check-in message arrives, the method retrieves the port for the secondary thread directly from the port message and saves it for later use.
기본 스레드 방법 : 목록 3-13 handlePortMessage를 보여줍니다. 데이터를 스레드의 고유 한 로컬 포트에 도착하면이 메서드가 호출됩니다. 때 체크에 메시지가 도착, 방법은 직접 포트 메시지에서 보조 스레드에 대한 포트를 검색하고 나중에 사용하기 위해 저장합니다.
Listing 3-13 Handling Mach port messages
#define kCheckinMessage 100 |
// Handle responses from the worker thread. |
- (void)handlePortMessage:(NSPortMessage *)portMessage |
{ |
unsigned int message = [portMessage msgid]; |
NSPort* distantPort = nil; |
if (message == kCheckinMessage) |
{ |
// Get the worker thread’s communications port. |
distantPort = [portMessage sendPort]; |
// Retain and save the worker port for later use. |
[self storeDistantPort:distantPort]; |
} |
else |
{ |
// Handle other messages. |
} |
} |
Implementing the Secondary Thread Code
보조 스레드 코드를 구현
For the secondary worker thread, you must configure the thread and use the specified port to communicate information back to the primary thread.
보조 작업자 스레드를 들어, 스레드를 구성하고 기본 스레드로 정보를 전달하기 위해 지정된 포트를 사용해야합니다.
Listing 3-14 shows the code for setting up the worker thread. After creating an autorelease pool for the thread, the method creates a worker object to drive the thread execution. The worker object’s sendCheckinMessage: method (shown in Listing 3-15) creates a local port for the worker thread and sends a check-in message back to the main thread.
목록 3-14 작업자 스레드를 설정하는 코드를 보여줍니다.스레드 autorelease를 풀을 만든 후,이 메소드는 스레드 실행을 유도하는 작업자 개체를 만듭니다.작업자 개체의 sendCheckinMessage : 메소드 (목록 3-15) 작업자 스레드 로컬 포트를 생성하고 전송 체크인 다시 메인 스레드에 메시지가 표시됩니다.
Listing 3-14 Launching the worker thread using Mach ports
+(void)LaunchThreadWithPort:(id)inData |
{ |
NSAutoreleasePool* pool = [[NSAutoreleasePool alloc] init]; |
// Set up the connection between this thread and the main thread. |
NSPort* distantPort = (NSPort*)inData; |
MyWorkerClass* workerObj = [[self alloc] init]; |
[workerObj sendCheckinMessage:distantPort]; |
[distantPort release]; |
// Let the run loop process things. |
do |
{ |
[[NSRunLoop currentRunLoop] runMode:NSDefaultRunLoopMode |
beforeDate:[NSDate distantFuture]]; |
} |
while (![workerObj shouldExit]); |
[workerObj release]; |
[pool release]; |
} |
When using NSMachPort, local and remote threads can use the same port object for one-way communication between the threads. In other words, the local port object created by one thread becomes the remote port object for the other thread.
NSMachPort를 사용할 때, 로컬 및 원격 스레드는 스레드 간의 단방향 통신을 위해 동일한 포트 개체를 사용할 수 있습니다. 즉, 하나의 스레드에 의해 생성 된 로컬 포트 개체가 다른 스레드에 대한 원격 포트 개체가됩니다.
Listing 3-15 shows the check-in routine of the secondary thread. This method sets up its own local port for future communication and then sends a check-in message back to the main thread. The method uses the port object received in the LaunchThreadWithPort: method as the target of the message.
목록 3-15 체크인 보조 스레드의 루틴을 보여줍니다. 이 방법은 미래의 통신을 위해 자신의 로컬 포트를 설정하고 전송 체크인 다시 메인 스레드에 메시지가 표시됩니다.방법은 LaunchThreadWithPort에서 수신 포트 개체를 사용하는 방법 : 메시지의 대상으로.
Listing 3-15 Sending the check-in message using Mach ports
// Worker thread check-in method |
- (void)sendCheckinMessage:(NSPort*)outPort |
{ |
// Retain and save the remote port for future use. |
[self setRemotePort:outPort]; |
// Create and configure the worker thread port. |
NSPort* myPort = [NSMachPort port]; |
[myPort setDelegate:self]; |
[[NSRunLoop currentRunLoop] addPort:myPort forMode:NSDefaultRunLoopMode]; |
// Create the check-in message. |
NSPortMessage* messageObj = [[NSPortMessage alloc] initWithSendPort:outPort |
receivePort:myPort components:nil]; |
if (messageObj) |
{ |
// Finish configuring the message and send it immediately. |
[messageObj setMsgId:setMsgid:kCheckinMessage]; |
[messageObj sendBeforeDate:[NSDate date]]; |
} |
} |
Configuring an NSMessagePort Object
NSMessagePort 개체 구성
To establish a local connection with an NSMessagePort object, you cannot simply pass port objects between threads. Remote message ports must be acquired by name. Making this possible in Cocoa requires registering your local port with a specific name and then passing that name to the remote thread so that it can obtain an appropriate port object for communication. Listing 3-16 shows the port creation and registration process in cases where you want to use message ports.
NSMessagePort 객체에 로컬 연결을 설정하려면, 당신은 단순히 스레드 사이의 포트 개체를 전달할 수 없습니다. 원격 메시지 포트를 이름으로 취득해야합니다. 코코아이 가능한 만드는 것은 특정 이름으로 로컬 포트를 등록 후 통신에 적합한 포트 객체를 취득 할 수 있도록 원격 스레드에 그 이름을 전달해야합니다. 목록 3-16는 메시지 포트를 사용하려는 경우 포트 생성 및 등록 프로세스를 보여줍니다.
Listing 3-16 Registering a message port
NSPort* localPort = [[NSMessagePort alloc] init]; |
// Configure the object and add it to the current run loop. |
[localPort setDelegate:self]; |
[[NSRunLoop currentRunLoop] addPort:localPort forMode:NSDefaultRunLoopMode]; |
// Register the port using a specific name. The name must be unique. |
NSString* localPortName = [NSString stringWithFormat:@"MyPortName"]; |
[[NSMessagePortNameServer sharedInstance] registerPort:localPort |
name:localPortName]; |
Configuring a Port-Based Input Source in Core Foundation
코어 재단에 포트 기반 입력 소스 구성
This section shows how to set up a two-way communications channel between your application’s main thread and a worker thread using Core Foundation.
이 섹션에서는 응용 프로그램의 주 스레드와 코어 파운데이션을 사용하여 작업자 스레드 사이에 양방향 통신 채널을 설정하는 방법을 보여줍니다.
Listing 3-17 shows the code called by the application’s main thread to launch the worker thread. The first thing the code does is set up a CFMessagePortRefopaque type to listen for messages from worker threads. The worker thread needs the name of the port to make the connection, so that string value is delivered to the entry point function of the worker thread. Port names should generally be unique within the current user context; otherwise, you might run into conflicts.
목록 3-17 작업자 스레드를 시작하는 응용 프로그램의 주 스레드에 의해 호출 된 코드를 보여줍니다.코드가하는 첫 번째 것은 작업자 스레드에서 메시지를 수신 할 수 CFMessagePortRefopaque 유형을 설정합니다.작업자 스레드가 문자열 값이 작업자 스레드의 진입 점 함수에 전달되도록 연결하려면 포트 이름이 필요합니다. 포트 이름은 일반적으로 현재 사용자 컨텍스트 내에서 고유해야합니다, 그렇지 않으면 당신은 충돌로 실행할 수 있습니다.
Listing 3-17 Attaching a Core Foundation message port to a new thread
#define kThreadStackSize (8 *4096) |
OSStatus MySpawnThread() |
{ |
// Create a local port for receiving responses. |
CFStringRef myPortName; |
CFMessagePortRef myPort; |
CFRunLoopSourceRef rlSource; |
CFMessagePortContext context = {0, NULL, NULL, NULL, NULL}; |
Boolean shouldFreeInfo; |
// Create a string with the port name. |
myPortName = CFStringCreateWithFormat(NULL, NULL, CFSTR("com.myapp.MainThread")); |
// Create the port. |
myPort = CFMessagePortCreateLocal(NULL, |
myPortName, |
&MainThreadResponseHandler, |
&context, |
&shouldFreeInfo); |
if (myPort != NULL) |
{ |
// The port was successfully created. |
// Now create a run loop source for it. |
rlSource = CFMessagePortCreateRunLoopSource(NULL, myPort, 0); |
if (rlSource) |
{ |
// Add the source to the current run loop. |
CFRunLoopAddSource(CFRunLoopGetCurrent(), rlSource, kCFRunLoopDefaultMode); |
// Once installed, these can be freed. |
CFRelease(myPort); |
CFRelease(rlSource); |
} |
} |
// Create the thread and continue processing. |
MPTaskID taskID; |
return(MPCreateTask(&ServerThreadEntryPoint, |
(void*)myPortName, |
kThreadStackSize, |
NULL, |
NULL, |
NULL, |
0, |
&taskID)); |
} |
With the port installed and the thread launched, the main thread can continue its regular execution while it waits for the thread to check in. When the check-in message arrives, it is dispatched to the main thread’s MainThreadResponseHandler function, shown in Listing 3-18. This function extracts the port name for the worker thread and creates a conduit for future communication.
포트 설치 및 스레드 시작과 함께, 메인 스레드는 스레드가 체크인하는 것이 기다리는 동안의 정기적 인 실행을 계속하면 체크인이있는 메시지가 도착, 그것은 주 스레드의 MainThreadResponseHandler 함수에 전달됩니다 Listing 3의 수 - 18. 이 기능은 작업자 스레드에 대한 포트 이름을 추출하고 미래의 의사 소통의 통로를 만듭니다.
Listing 3-18 Receiving the checkin message
#define kCheckinMessage 100 |
// Main thread port message handler |
CFDataRef MainThreadResponseHandler(CFMessagePortRef local, |
SInt32 msgid, |
CFDataRef data, |
void* info) |
{ |
if (msgid == kCheckinMessage) |
{ |
CFMessagePortRef messagePort; |
CFStringRef threadPortName; |
CFIndex bufferLength = CFDataGetLength(data); |
UInt8* buffer = CFAllocatorAllocate(NULL, bufferLength, 0); |
CFDataGetBytes(data, CFRangeMake(0, bufferLength), buffer); |
threadPortName = CFStringCreateWithBytes (NULL, buffer, bufferLength, kCFStringEncodingASCII, FALSE); |
// You must obtain a remote message port by name. |
messagePort = CFMessagePortCreateRemote(NULL, (CFStringRef)threadPortName); |
if (messagePort) |
{ |
// Retain and save the thread’s comm port for future reference. |
AddPortToListOfActiveThreads(messagePort); |
// Since the port is retained by the previous function, release |
// it here. |
CFRelease(messagePort); |
} |
// Clean up. |
CFRelease(threadPortName); |
CFAllocatorDeallocate(NULL, buffer); |
} |
else |
{ |
// Process other messages. |
} |
return NULL; |
} |
With the main thread configured, the only thing remaining is for the newly created worker thread to create its own port and check in. Listing 3-19 shows the entry point function for the worker thread. The function extracts the main thread’s port name and uses it to create a remote connection back to the main thread. The function then creates a local port for itself, installs the port on the thread’s run loop, and sends a check-in message to the main thread that includes the local port name.
주 스레드 구성으로, 남아있는 유일한 것은 새로 만든 작업자 스레드는 자신의 포트를 생성하고 목록 3-19 작업자 스레드의 진입 점 함수를 보여줍니다 체크인 할 수 있습니다. 이 함수는 메인 스레드의 포트 이름을 추출하고 주 스레드에 대한 원격 연결을 다시 만드는 데 사용합니다. 그런 다음이 함수는, 자체 로컬 포트를 생성하는 스레드의 실행 루프에 포트를 설치하고 전송 체크인 로컬 포트 이름을 포함하는 주 스레드에 메시지가 표시됩니다.
Listing 3-19 Setting up the thread structures
OSStatus ServerThreadEntryPoint(void* param) |
{ |
// Create the remote port to the main thread. |
CFMessagePortRef mainThreadPort; |
CFStringRef portName = (CFStringRef)param; |
mainThreadPort = CFMessagePortCreateRemote(NULL, portName); |
// Free the string that was passed in param. |
CFRelease(portName); |
// Create a port for the worker thread. |
CFStringRef myPortName = CFStringCreateWithFormat(NULL, NULL, CFSTR("com.MyApp.Thread-%d"), MPCurrentTaskID()); |
// Store the port in this thread’s context info for later reference. |
CFMessagePortContext context = {0, mainThreadPort, NULL, NULL, NULL}; |
Boolean shouldFreeInfo; |
Boolean shouldAbort = TRUE; |
CFMessagePortRef myPort = CFMessagePortCreateLocal(NULL, |
myPortName, |
&ProcessClientRequest, |
&context, |
&shouldFreeInfo); |
if (shouldFreeInfo) |
{ |
// Couldn't create a local port, so kill the thread. |
MPExit(0); |
} |
CFRunLoopSourceRef rlSource = CFMessagePortCreateRunLoopSource(NULL, myPort, 0); |
if (!rlSource) |
{ |
// Couldn't create a local port, so kill the thread. |
MPExit(0); |
} |
// Add the source to the current run loop. |
CFRunLoopAddSource(CFRunLoopGetCurrent(), rlSource, kCFRunLoopDefaultMode); |
// Once installed, these can be freed. |
CFRelease(myPort); |
CFRelease(rlSource); |
// Package up the port name and send the check-in message. |
CFDataRef returnData = nil; |
CFDataRef outData; |
CFIndex stringLength = CFStringGetLength(myPortName); |
UInt8* buffer = CFAllocatorAllocate(NULL, stringLength, 0); |
CFStringGetBytes(myPortName, |
CFRangeMake(0,stringLength), |
kCFStringEncodingASCII, |
0, |
FALSE, |
buffer, |
stringLength, |
NULL); |
outData = CFDataCreate(NULL, buffer, stringLength); |
CFMessagePortSendRequest(mainThreadPort, kCheckinMessage, outData, 0.1, 0.0, NULL, NULL); |
// Clean up thread data structures. |
CFRelease(outData); |
CFAllocatorDeallocate(NULL, buffer); |
// Enter the run loop. |
CFRunLoopRun(); |
} |
Once it enters its run loop, all future events sent to the thread’s port are handled by the ProcessClientRequest function. The implementation of that function depends on the type of work the thread does and is not shown here.
일단 그것의 실행 루프에 들어갑니다, 스레드의 포트로 전송 이후의 모든 이벤트는 ProcessClientRequest 함수에 의해 처리됩니다. 이 기능의 구현은 스레드가 여기에 표시되지 않는 작업의 유형에 따라 달라집니다.